"Ecto-1's" Undercarriage...
Dr. Stantz - "Everybody can relax, I found the car! Part of the humor behind the "Ectomobile" was that despite it's shiny exterior, underneath laid an old beater that ran, but only just. I wanted to keep this theme with my model but before I could get started I had a tough decision to make (well, tough for me anyway). The undercarriage to the "Ghostbusters II Ecto 1A" 1/25 scale model kit is nice but not very detailed (it's just a single piece of plastic). My goal was to put a lot of work into this model, to make it as detailed as my current skills would allow. Because of that, it took me a long time to decide how I was going to approach this particular part of the kit. I spoke to a few people who had assembled this kit themselves, and most simply spray painted the entire undercarriage black, or a rust color, and left it at that (figuring that no one would ever see it anyway). Being the detail freak that I am though, that approach wasn't going to fly with me. The flip side would have been to hunt down a 1/25 scale vintage Cadillac kit of some sort and kitbash an undercarriage. My anal side was really trying to tug me in this direction, but in the end I decided that this would have been too much of a gamble. There were too many factors to worry about like: Was it worth my time and money to hunt for a second kit that I may not even be able to use? Would a kitbashed undercarriage cause a spatial issue, i.e. would it force me to do some serious retooling to the kit's interior? Would the end result be too brittle, would it end up bowing or warping with age? In the end my sensible side kicked in and I settled on a middle-ground solution. I wasn't going to customize this particular piece, nor was I going to spray paint it a solid color and forget about it. Instead I decided to give it a full detailed paintjob. Now all I had to do was figure out what the factory colors were for a 1959 Miller Meteor Cadillac Combination Hearse/Ambulance. After failing to find adequate reference photos on the net I was pointed to "The Professional Car Society". There, a Mr. Steinberg had the info I was looking for... "Generally speaking when a car came from the factory, the exhaust was steel and the suspension was painted semi gloss black along with the frame. The transmission was bare aluminum and the transmission pan was natural steel. Engine was painted the color of the brand of car engines... i.e. Chevy = orange, Cadillac = blue, Chrysler = gold (if memory is correct), etc. Some suspension parts were bare steel also, such as Pitman arms, and idler arms. The relay rod was also plain steel... in fact, most of the steering components were not painted, but the control arms were. The shocks were usually black or a blue grey on GM cars depending on the YOM..." With that I was able to lay down the base colors... 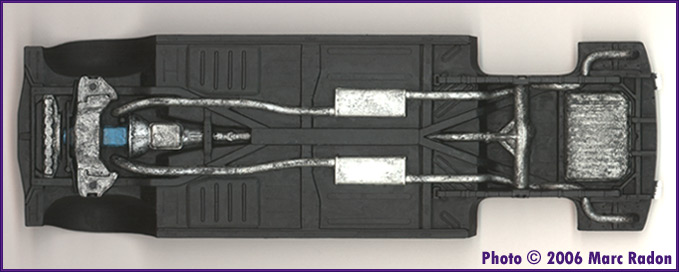
Wanting to make this piece look as weathered as possible I skipped the Semi-Gloss and grabbed "Flat Black" instead (I was going to apply a "Dull Coat" to the whole thing at the end anyway). During my previously mentioned search for reference photos, I was fortunate enough to have stumbled across a picture of an actual 1959 Caddy engine block. It's deep blue paint had faded and become stained over the decades, giving it a slight greenish tint. In order to replicate this color I swung by my favorite comic shop and picked up a few bottles of "Citadel Colour" miniature paints. Using a combination of "Enchanted Blue", "Ice Blue", and "Hawk Turquoise" I was able to match the color to the photo pretty closely. Painting the aluminum and steel parts was straight forward, and when I finished with those I applied splotches of black enamel to the whole undercarriage (giving it a greasy, oily, and generally dirty / old look). I even applied large splotches of enamel to the areas that were already painted black in order to give the surface an uneven texture for the next step (applying the rust)... To be continued... |
This website and all of it's content is © 2003-2009 Marc Radon unless otherwise stated. Please do not reproduce, redistribute, or alter any of this site's content without the artist's written permission.